You can install the Matrix Destiny Calculator plugin in two ways: automatically through the WordPress dashboard (recommended) or manually via FTP.
-
Automatic Installation (Recommended)
- Log in to your WordPress admin dashboard.
- Go to Plugins > Add New.
- Click the Upload Plugin button at the top.
- Select the file
matrix-destiny-calculator.zipfrom your computer. - Click Install Now.
- After installation, click Activate Plugin.
-
Manual Installation (FTP)
- Unzip the downloaded
matrix-destiny-calculator.zipfile. - Connect to your website using an FTP client (for example, FileZilla).
- Upload the extracted plugin folder to:
/wp-content/plugins/ - Log in to your WordPress admin dashboard.
- Go to Plugins > Installed Plugins.
- Find Matrix Destiny Calculator and click Activate.
- Unzip the downloaded
- Once activated, the plugin is ready to use. You can now configure it, add your content, and start using the Matrix Destiny Calculator on your website.
Using the Matrix Destiny Calculator Shortcode
The Matrix Destiny Calculator plugin provides a simple shortcode that allows you to display the calculator anywhere on your website, including pages and posts.
[matrix]
How to Use the Shortcode
- Open the page or post where you want to display the calculator.
- Paste the shortcode
[matrix]into the content editor. - Save or publish the page.
Important for Elementor Users
⚠️ Do not use the shortcode inside the Elementor Text widget. This may cause layout issues or prevent the calculator from displaying correctly.
Instead, use the Elementor Shortcode widget and paste the shortcode inside it.
[matrix]
Example
You can create a new page titled Destiny Matrix and insert the shortcode into the main content area or into a Shortcode widget if you are using Elementor.
Optional Parameters
To control access to unlimited Destiny Matrix results, you can use
the shortcode with the subscribtion parameter:
[matrix subscribtion="true"]
This option is useful for pages restricted by a subscription system, such as WooCommerce Memberships or other access control plugins. Only users with the required permissions will be able to view the results.
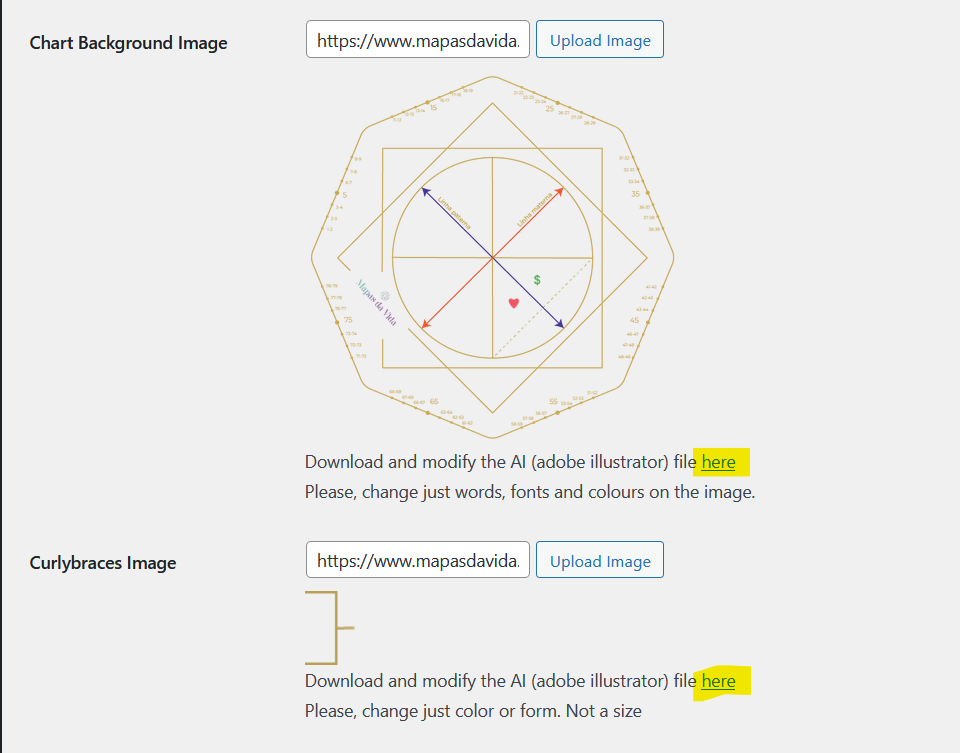
Chart and Curly Braces Customization
The Matrix Destiny Calculator plugin allows you to fully customize the visual appearance of the chart and curly braces used in the calculator.
You can upload your own images to replace the default chart and curly braces, giving you complete control over the design.
Using Custom Images
- Prepare your custom chart and curly braces images.
- Go to the plugin settings page in your WordPress admin panel.
- Upload your images to replace the default visuals.
- Save the settings to apply the changes.
Advanced Editing (Vector Files)
For advanced customization, you can download the original visual files in editable vector format (AI).
These files can be opened and edited using tools such as Adobe Illustrator or any compatible vector graphic editor.
After editing:
- Export the images as PNG or SVG.
- Upload the exported files back into the plugin settings.
This customization option gives you full creative freedom, allowing the chart design to perfectly match your brand identity or personal aesthetic.
Full Calculator Translation
The Matrix Destiny Calculator plugin allows you to fully translate the calculator interface directly from the WordPress admin panel.
Every label, title, description, and result text used in the calculator can be customized — word by word — without editing any code.
How Translation Works
All texts displayed in the calculator are editable through the plugin settings. This includes:
- Input field labels
- Buttons and actions
- Chart labels and descriptions
- Result titles and explanations
- Messages and notices
Translating the Calculator
- Open your WordPress admin dashboard.
- Navigate to the Matrix Destiny Calculator settings page.
- Locate the translation or text fields section.
- Edit each text field with your desired language.
- Save the settings to apply the changes.
This approach allows you to localize the calculator for any language or adapt the wording to your personal style, brand voice, or audience.
No additional translation plugins or language files are required.
Note: The screenshot below shows the admin interface where all calculator texts can be edited.
Product Integration & Purchase Flow
The Matrix Destiny Calculator plugin can be connected to a WooCommerce product, allowing you to sell personalized Destiny Matrix results based on a customer’s birthdate.
How the Purchase Flow Works
When a product is selected in the plugin settings and linked to a calculator page, the purchase process works as follows:
-
Product Selection
When the customer purchases the selected product, an additional field Birthdate appears on the WooCommerce checkout page. -
Data Storage
The birthdate entered by the customer is securely saved together with the order. -
Redirect After Purchase
After successful payment, the customer is automatically redirected to the calculator page defined in the plugin settings. -
Using the Calculator Page
On the calculator page, the date input field is hidden. Instead, a dropdown menu is displayed. -
Access to Results
The dropdown contains all birthdates purchased by the customer. When a date is selected, the calculator displays the results for that specific birthdate only.
Multiple Purchases
If the customer makes multiple purchases for different birthdates, all purchased dates will appear in the dropdown menu on the calculator page.
The user can freely switch between dates to view the individual Destiny Matrix results for each one.
Use Cases
This setup makes it possible to sell Destiny Matrix reports for:
- Friends or family members
- Clients (for professional numerologists)
- Multiple personal profiles under one account
By linking purchases to birthdates, you can offer fully personalized Destiny Matrix results while keeping the user experience simple and intuitive.